Classier than toting your wine around in a brown paper bag!
Made this a couple of weeks ago!
Just add wine!
Nicole's Blog
Recreating ideas that I have seen on Pinterest or in Stores.
Sunday, 14 April 2013
Safety Pin Bracelet
What you will need!
Safety Pins 1 1/4 inch
Sea Glass Beads- any colour- I mixed mine, you can use any pattern or even a solid all throughout *** I got these at the dollar store
Elastic Cord- I bought black
1. Open safety pins and string beads on to the safety pin. It should be full and be able to close.
2. Cut two pieces of cord. Make sure it is long enough to wrap around your wrist and than add a couple of inches.
3. Tie one piece of cord at one end of the safety pin and the second at the other end of the safety pin.- SEE IMAGE
4. Continue to string the safety pins on to the two pieces of cord. Reverse the safety pins so they are not all running the same was- See image
5. Once you reach the desired length loop the cord through the first safety pin and knot off on the inside of the bracelet.
6. Trim and extra cord.
7. If you want to be sure the knot will not come loose you can use hot glue and glue the knot
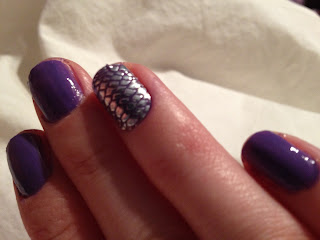
Nails
Used a heart hole punch and painters tape to make a stencil. Applied the painters tape to my nail and painted over the hole/ heart!
I used the new Essie Sleek Stickers! I only used one as an accent nail however there is enough in the package to do all of your nails. The stickers are lasting longer than my nail polish! They have been through showering, washing my hands several times, cleaning.. etc.! Still on after 5 days!
http://www.essie.com/sleek/
The picture below shows the different styles.

Saturday, 13 April 2013
Wine Glasses Decorated with Acrylic Paint
1. Clean glasses and dry well
2. Paint any design on to your glasses. (I used an end of a pencil and dipped it in paint to make the poka dots)
3. Let glasses dry. At least 1 hr.
4. Place in oven.
5. Turn oven on to 350 and bake for 30 min.
6. Open oven and allow to cool before taking them out (this is to prevent the glass from cracking)
7. Once dry allow glasses to sit for 24hrs.
8. Open a bottle of wine and enjoy!
I hand wash mine.
Try other glasses like vases, drinking glasses, and glass bowls.
Friday, 12 April 2013
Cases for Hair Straighteners
Rectangular Pot Holder
1. Fold the pot holder.
2. Iron it flat.
3. Stitch along the edge.
4. Add your hot hair straightener or curing iron.
1. Fold the pot holder.
2. Iron it flat.
3. Stitch along the edge.
4. Add your hot hair straightener or curing iron.
Subscribe to:
Comments (Atom)


